

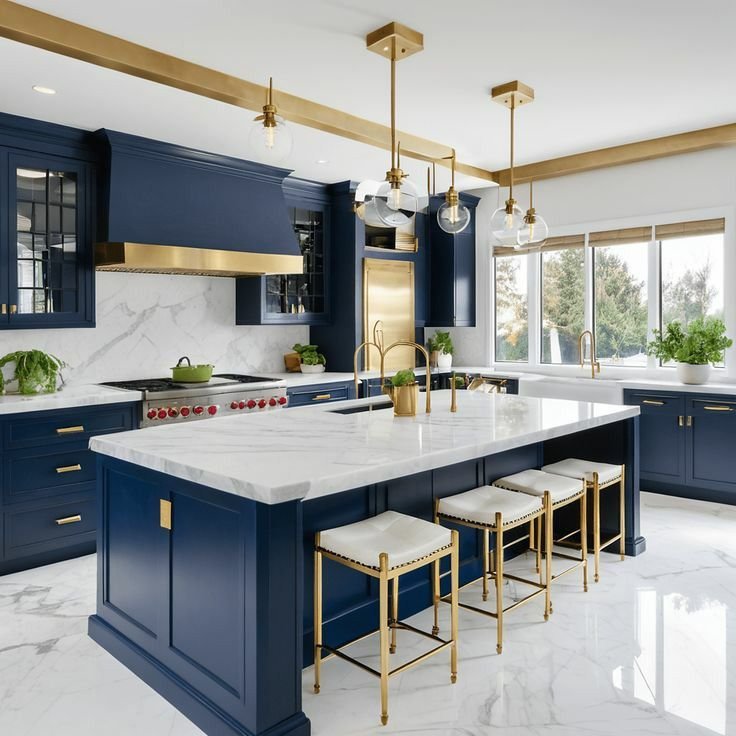

Introduction to Painting Kitchen Cabinets
Painting kitchen cabinets offers an effective solution for homeowners looking to enhance the aesthetic appeal of their kitchens while maintaining budgetary constraints. This cost-effective method provides a fresh look without the financial burden associated with a full renovation. By simply changing the color or finish of the cabinets, individuals can create a dramatic transformation that revitalizes the kitchen environment.
One of the most common reasons homeowners decide to repaint their kitchen cabinets is to modernize an outdated space. Over time, trends in color and design evolve, and cabinets that once seemed stylish may begin to appear dull or out of place. A fresh coat of paint enables homeowners to infuse current styles into their kitchens, aligning their spaces with contemporary aesthetics.
Moreover, painting cabinets can significantly improve the resale value of a home. Potential buyers often place high importance on the kitchen’s design and feel. By investing time and resources into painting cabinets, sellers can present a well-maintained and inviting kitchen, thus attracting more interest from prospective buyers. This strategic enhancement can lead to quicker sales and potential price increases.
In addition to aesthetic benefits, painting cabinets also allows for personalization. Homeowners have the flexibility to select colors that reflect their personal style, whether that be bold shades for a dramatic effect or softer hues for a more classic look. Moreover, the process often encourages creativity, enabling homeowners to experiment with different techniques and finishes to achieve their desired outcome.
In conclusion, the decision to paint kitchen cabinets provides numerous advantages including cost-effectiveness, modernization, increased home value, and the opportunity for personal expression, making it an appealing option for many homeowners.
Step 1: Preparation and Planning
Before embarking on the task of painting kitchen cabinets, thorough preparation is essential to achieving a professional finish. One of the first steps in this phase is to measure the cabinets accurately. Taking precise measurements will not only help ensure that you purchase the right amount of paint but will also assist in planning the logistics of the project.
Selecting the appropriate type of paint is another critical decision. For kitchen cabinets, a semi-gloss or satin finish paint is often recommended due to its durability and ease of cleaning. It is also imperative to consider the material of your cabinets; for instance, laminate cabinets may require a different kind of primer or paint compared to solid wood. Be aware of the environmental factors as well; methods to reduce toxic fumes, such as using low-VOC paint, contribute to a healthier home environment.
Color selection plays a significant role in the overall aesthetic of the kitchen. It is advisable to gather samples and test them in the actual kitchen setting before making a final choice. The kitchen often serves as the heart of the home, so the color should reflect your style while complementing the surrounding decor.
In conjunction with selecting the right materials, gathering tools is paramount for a smooth painting process. Essential tools include high-quality brushes or rollers for applying paint, painter’s tape to protect areas that should not be painted, and drop cloths to catch any drips or spills. Other recommended materials comprise a sanding block, primer, and a paint tray.
By meticulously preparing and planning before starting the painting process, you set the foundation for a successful kitchen cabinet transformation that will enhance the functionality and beauty of your space.
Step 2: Cleaning and Sanding the Cabinets
Whether you are refreshing your kitchen aesthetically or preparing for a complete remodel, cleaning and sanding your cabinets is a critical phase that dictates the success of your paint project. Before you begin painting, it is essential to eliminate any grease, grime, or dirt that may be present on the surface of the cabinets. For this purpose, using a mixture of warm water and mild dish soap is advisable. Alternatively, a specialized degreaser can be employed for tougher residues. Whichever solution you choose, ensure to use a soft cloth or sponge to gently clean the surface, avoiding any abrasives that could scratch the finish.
Once the cabinets are clean, the next step involves sanding. Sanding serves two principal purposes: it roughens the surface to provide better paint adhesion and it helps to remove any existing lacquer or finish that may interfere with the new paint layer. A medium-grit sandpaper (typically 120-150 grit) works well for this task. Start by lightly sanding the cabinet surfaces, always moving in the direction of the wood grain to prevent scratches. If your cabinets are made of laminate or a similar material, consider using finer sandpaper (around 220 grit) to avoid damaging the surface.
It is crucial to understand the ramifications of inadequate cleaning and sanding. Failing to prepare the surfaces adequately may lead to paint peeling, bubbling, or uneven finish. Therefore, take your time during this step and ensure that all surfaces are properly prepped. After sanding, it is also important to remove any dust generated during this process. A damp cloth or a vacuum cleaner equipped with a brush attachment can be particularly effective for this purpose. Proper cleaning and sanding will create an optimal foundation for the new paint, enhancing both longevity and appearance.
Step 3: Priming the Cabinets
Priming is a crucial step when it comes to painting kitchen cabinets, as it sets the foundation for an exceptional finish. The primary function of a primer is to block stains, which can otherwise bleed through your paint and ruin the overall aesthetic. By using a quality primer, you can prevent any unsightly marks from affecting the final appearance of your painted cabinets.
Moreover, a good primer enhances paint adherence. Kitchen cabinets are subjected to various elements such as grease, humidity, and heat, making the need for strong adhesion critical. When a primer is applied, it creates a surface that allows the paint to stick more effectively, which results in a longer-lasting and durable finish. This is especially important in high-use areas like the kitchen, where wear and tear can occur more rapidly.
In addition to these functional benefits, a proper primer can also improve the final look of your cabinetry. It provides a uniform base color that helps the paint achieve a more consistent tone and sheen, ultimately enhancing the overall finish of your project.
When selecting the right type of primer for your kitchen cabinets, consider using a high-quality oil-based or acrylic primer. Oil-based primers tend to provide excellent stain-blocking properties, while acrylic primers dry faster and are easier to clean up. If you are painting previously stained or dark cabinets, an oil-based primer may be more effective in preventing any color from bleeding through. Conversely, if you are working with a lighter color, an acrylic primer might suffice.
In summary, using a primer for your kitchen cabinets is essential for achieving a polished and durable finish, providing both protection and enhanced adhesion for the paint applied on top.
Step 4: Painting the Cabinets
When it comes to painting kitchen cabinets, the process requires careful attention to detail to ensure a flawless finish. Initially, you need to select the right tools for the job. Brushes and rollers are commonly used, but air sprayers can offer an even application that reduces brush strokes and achieves a more professional appearance. If you opt for a sprayer, practice beforehand on a piece of cardboard to understand the distance and speed necessary for a smooth application.
Before starting, ensure your workspace is clean and well-ventilated. Begin by applying a primer coat if you are painting over a darker color or applying a light color. Primer will help the paint adhere better and provide an even base. Once the primer is dry, you can start applying the paint. It is advisable to use high-quality paint for a durable and lasting finish. A semi-gloss or satin finish is preferred in kitchens as it is easier to clean and provides a subtle sheen.
For applying the paint, use long, even strokes with your chosen tool, and be consistent with your technique. Work from the top down to avoid drips and ensure that you cover each cabinet surface completely. Allow the first coat to dry thoroughly before applying a second coat, usually taking at least 2 to 4 hours, depending on the paint brand and humidity levels in your workspace.
In case of drips or mistakes, act quickly—smooth them out with a clean brush before the paint dries. This will save you a headache later during touch-ups. Once the second coat has dried, inspect the cabinets for any areas that may need additional coverage, especially on edges and corners. With these methods, you will achieve a beautifully painted cabinet that enhances the overall design of your kitchen.
Step 5: Finishing Touches and Reassembly
After completing the painting process of your kitchen cabinets, the final step involves adding those crucial finishing touches that can elevate the overall look of your freshly painted cabinetry. One of the first elements to consider is the hardware. Replacing old cabinet knobs and pulls with new ones can dramatically change the aesthetic appeal of the kitchen. Opt for finishes that complement your new cabinet color, such as brushed nickel, matte black, or even gold accents, depending on the desired style of your kitchen.
Additionally, incorporating soft-close hinges can provide a modern touch while enhancing functionality. If you decide to keep the existing hardware, ensure they are cleaned thoroughly to remove any paint residue, enhancing their appearance and ensuring they pair well with the new cabinet finish.
Before proceeding to reassemble, it is crucial to allow the paint on the cabinets to cure fully. This step is essential as it ensures that the paint maintains its integrity and adhesion, minimizing the risk of chipping or damage during the reassembly process. Depending on the type of paint used, curing can take anywhere from a few days to several weeks, so refer to the manufacturer’s guidelines for specific instructions.
When reassembling the cabinets, start by attaching the doors, carefully aligning them with the pre-drilled holes to ensure a proper fit. Utilize a level to ensure that the cabinets are straight and adjust if necessary. Once the doors are in place, add the new hardware and check that everything is secure. Lastly, consider adding some decor elements, such as decorative dishware or fresh herbs, to give your kitchen a personalized touch and make the newly painted cabinets truly stand out.
Common Mistakes to Avoid when Painting Cabinets
Painting kitchen cabinets can be a rewarding project, but it often comes with its own set of challenges. Many DIY enthusiasts make common mistakes that can significantly affect the outcome of their work. One frequent error is skipping the priming step. Primer not only helps with adhesion but also creates a smooth surface that enhances the paint’s finish. Without primer, the paint can chip or peel over time, leading to unsatisfactory results.
Another common mistake is rushing the sanding process. Proper sanding is crucial for achieving a flawless finish. Failing to thoroughly sand the cabinets can result in an uneven application of paint. It’s essential to use the appropriate grit sandpaper and to take the time to remove any dust and debris between coats. Thorough sanding not only enhances adhesion but also helps fill in any imperfections in the cabinet surface.
In addition, using the wrong type of paint can yield disappointing results. It is imperative to choose high-quality paint that is specifically designed for cabinetry. Oil-based paints are often preferred for their durability, though water-based alternatives are becoming increasingly popular due to their ease of use and lower VOC emissions. Ensure the paint is suitable for the specific conditions of your kitchen, such as moisture and heat.
Lastly, neglecting to protect the surrounding areas can lead to unwanted messes and damages. Using painter’s tape to cover edges and drop cloths to protect floors is essential in maintaining a clean workspace. By avoiding these common pitfalls, DIYers can achieve a professional-looking finish on their kitchen cabinets.
Maintenance Tips for Painted Cabinets
Proper care and maintenance of painted kitchen cabinets are essential to prolong their lifespan and maintain their aesthetic appeal. Regular cleaning is crucial; however, it is important to use gentle products to avoid damaging the paint. A solution of warm water and mild dish soap is often sufficient for routine cleaning. It is advisable to use a soft cloth or sponge to gently wipe the surfaces, as abrasive materials can scratch the paint, causing it to deteriorate over time.
In addition to routine cleaning, addressing any chips or scratches promptly can help preserve the finish of your cabinets. For minor damage, a paint touch-up might be very effective. It is advisable to keep a small container of the original cabinet paint for this purpose. Clean the area around the chip with a damp cloth, allow it to dry completely, then apply a thin layer of paint with a small brush. Feathering the edges may help blend the new paint with the existing finish.
Another aspect of general maintenance involves avoiding exposure to excessive moisture and steam, which can affect the quality of the paint. Use exhaust fans or open windows while cooking to minimize humidity in the kitchen. Additionally, storing cleaning supplies away from the cabinets can help prevent unintentional spills or damage.
Finally, adjusting cabinet hardware and hinges can prevent unnecessary wear on the painted surfaces. Ensure that doors and drawers function smoothly without excessive force. By adopting these maintenance techniques, homeowners can keep their painted kitchen cabinets looking fresh and new for many years, ensuring that the investment made in this upgrade is well protected.
Conclusion and Encouragement to Start the Project
Completing a kitchen cabinet painting project can significantly enhance the overall aesthetic of your home. The steps outlined in this guide cover everything from preparing your cabinets to applying the final coat of paint, which simplifies the process and allows for an organized approach to this engaging DIY task. By following these five proven steps, you can transform your kitchen effortlessly, providing a fresh and vibrant look that breathes new life into your space.
To recap, the first step involves thorough preparation, such as cleaning the surfaces and removing hardware, ensuring that your painting adheres effectively. Next, applying a primer lays the foundation for high-quality paint application, while selecting the appropriate paint for cabinets specifically tailored for durability and ease of cleaning is crucial. The technique of using quality brushes or rollers ensures a smooth finish, and finally, allowing adequate drying time guarantees a professional-grade result.
As you consider embarking on this home improvement journey, remember that painting your kitchen cabinets not only improves their visual appeal but also contributes to a sense of accomplishment and pride in your home. Engaging in DIY projects like this fosters creativity and allows you to personalize your space precisely to your style. With the right tools, patience, and attention to detail, you’ll not only enhance your kitchen but will also cultivate valuable skills in the process.
So, gather your supplies, clear some space, and visualize the stunning transformation your kitchen will undergo. It’s time to take a bold step and bring your vision to life. Happy painting!